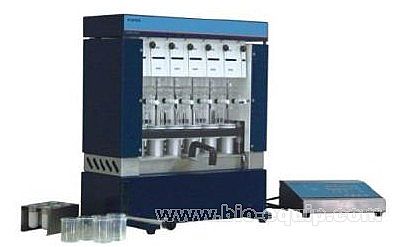
ST310 Soxhlet extraction unit using brief steps
control unit
The SET button is used in two places in the control unit. One is the over-temperature protection section for the control unit for setting the correct temperature. This key is only valid when LOCK is on. The other is a program control section in the control unit for stepwise adjustment of different settings, such as temperature and time during each step of the extraction process.
The LOCK key is used to lock the selected over-temperature setting and prevent it from being changed by unauthorized personnel. When it is unlocked, the button changes the temperature. This key should be controlled / carried by the laboratory manager .
The START/STOP button is used to start or stop the leaching program.
The PLUS/MIMUS set of keys is used to select the program during the analysis. It is also used in combination with a step-by-step adjustment for lifting and setting the temperature.
The TIMER button initiates a countdown in the extraction step (eg boiling, rinsing). When the countdown count reaches 00 : 00 , the buzzer of the control unit is turned on. Press the TIMER button to turn off the beep signal.
THE BUZZER SIGNAL
To make the buzzer sound, you must press the SET button while turning on the power to the control unit, and press and hold until the software version information is displayed. To restore the buzzer, repeat the above steps.
The AIR button is turned on during the recovery step of the leaching analysis program to start the air pump.
To set a new run time for the air pump, press and hold this button to turn off the control unit and then turn on the control unit. Then use the keys to adjust to the desired time and press the key to lock
The HOT PLATE button is used to preheat the heating plate before analysis.
 operating
Control device setting
Press the "POWER" button of the control unit (the switch light is on), the display will show the built-in software version number, and then in the standby state, such as: display the previously used program.
Use the or key to select the #1-#9 analysis program and check that the overtemperature setting matches the correct setting of the solvent in the application note.
Note: If the overtemperature protection setting is incorrect or not in the recommended form, please contact the laboratory supervisor to confirm the correct settings. If this is the first time application and you need to reset the program, please see the next section.
Set up a new program
Use the relevant application briefing and Form 3 to set the correct temperature and leaching time for the analytical method. First, select a program with the key, then use the keys and keys to set the temperature and leaching time for each leaching step. After the editing is finished, wait for the display to stop flashing or press the button after editing to the last leaching step. The solvent recovery time should refer to the empirical time of the previous solvent return to the collector, typically between 5-10 minutes (depending on the type of solvent and temperature setting). If there are still samples to be analyzed later, the fourth step can maintain the hot plate temperature for up to 59 minutes.
Cooling water
Before starting the analysis, the system should first supply cooling water and adjust the flow rate to 1-2 liters / minute ( 20 ° C ).
Preheating
The heating plate can be preheated by pressing the button before the analysis starts, and the heating plate will be heated to the set temperature of the display program.
Sample preparation
Sample preparation is very important to get the right results. See the application note AN301 for more information . Some types of samples, such as meat, need to be mixed with quartz sand or diatomaceous earth. The preparation of the sample follows the classical Soxhlet extraction method.
start up
Press the power button (the light should be on ) .
Open the chiller valve of the reflux condenser and the flow rate of water should be adjusted to 1-2 liters / min to prevent solvent evaporation through the condenser.
Warning Warning
Strict laboratory safety regulations, careful handling of various solutions during the analysis. Use the appropriate material to pick and place the solvent according to the safety instructions in the reagent manual.
Eye protection is required during all operating hours.
extraction
Connect the filter cartridge connector to the filter cartridge.
Weigh the sample directly into the filter cartridge.
Place the filter cartridge on the cartridge holder.
Fill the top of the sample with absorbent cotton and place the filter cartridge into the leaching unit.
Move each knob to the Boiling position and the cartridge will be attracted to the magnetic ring; move the knob down to the Rinsing position and the cartridge will hang below the condenser return valve.
Insert six dip cups, peel the glass beads ( 5mm ) together, and load 20-50 ml of the solvent to be used. Use the immersion cup holder pull-down handle to ensure that the safety hooks engage. The immersion cup is now clamped into the condenser.
Press the button on the control unit to start the program. The buzzer will signal when the temperature reaches 5 degrees below the set temperature .
Press the timer button and move the immersion mode knob to the "Boiling" position. The filter cartridge is now immersed in the solvent.
Boil in the state where the filter cartridge is submerged (the length of time depends on the type of sample and solvent ) to ensure that the condenser return valve is open.
When the buzzer sounds, move the knob to the "Rinsing" position. The cartridge is suspended from the surface of the solvent and press the timer button.
Solvent recovery, removal of filter cartridges and dip cups
After the rinse is complete, turn the return valve a quarter turn to close the condenser valve.
When there are 3 minutes left in the analysis process , the air pump will automatically turn on and the last trace of solvent will be collected in the condenser. When the countdown is completed, the control unit will beep. If you want to keep the pump working longer ( more than 3 minutes ) , you must turn it on manually, which may be necessary for high boiling solvents such as toluene or xylene. Once all the cups have dried, they are removed from the hot plate.
Remove the filter cartridge.
If the next leaching analysis is to be performed immediately, a new batch of filter cartridges and immersion cups are loaded and the condenser return valve is opened.
Note : The volume of recovered solvent can be adjusted by adding a solvent to the top of the condenser.
Drying step - continue heating
After the recovery step is completed, the control unit can maintain the temperature of the hot plate for 59 minutes.
To set up this program, set the desired value for the fourth step on the controller between 0 and 59 minutes.
Reset over temperature protection
Wait until the heater plate temperature is below the overtemperature limit.
Turn off the power.
Turn on the power.
Rotate the over-temperature protection key to the unlock position. Rotate the over temperature protection key to the locked position.
Agricultural Seed Drills,Precision Seed Drills,6 Rows Precise Seeder,Seeding Machine
Shandong Dahua Machinery Co.,Ltd , https://www.agrodahua.com